Showing posts with label C#. Show all posts

Saturday, December 26, 2009

Workflow Without Windows Workflow

Hello, it has been a while since I wrote my last blog. Anyway, I am back again. I have a nice blog today, I have been working for a while with a team which his main target is to use everything Microsoft has released. It is a good thing sometimes and a very bad thing the other times. They read a "workflow" word in the requirements document, the first came to their mind was WF (Windows Workflow Foundation). The problem was so simple using WF would be over engineering. So, I decided to think of a more simple solution. As I am a Spring.NET Freak and I think we can't build an application without using it, I thought of using it :).

First, Let us create a State class first:

    public class State
    {
        private string _id;
        private string _name;
        private List<link> _links;

        public List NextStates
        {
            get
            {
                return Links.Select(l => l.State).ToList();
            }
        }

        public string Id
        {
            get { return _id; }
            set { _id = value; }
        }

        public List<link> Links
        {
            get { return _links; }
            set { _links = value; }
        }

        public string Name
        {
            get { return _name; }
            set { _name = value; }
        }

        public bool IsEndState
        {
            get
            {
                return Links.Count == 0;
            }
        }
    }

And a Link class:

    public class Link
    {
        //this condition will written used SPEL (Spring Expression Langauge)
        public string Condition { get; internal set; }
        public State State { get; internal set; }
    }

Then create the interface for the state machine:

    public interface IStateMachine
    {
        State InitialState { get; }
        State CurrentState { get; }
        void SetCurrentState(string id);
        bool Advance();
        List NextStates { get; }
    }
Then comes spring to the rescue, Spring here will used for 2 main tasks:
  1. Configuration File for our Workflow (State Machine): Keeps the state information and the transitions between states.
  2. Spring Expression will be used to define the transition rules between different states.
I decided to implement a simple interview process as an illustration for my small framework:

The spring configuration file for the mentioned process will be as follows:

<xml version="1.0" encoding="utf-8" ?>
<objects xmlns="http://www.springframework.net">
 
  <object id="ExamToFirstInterview" type="SimpleStateMachine.Link, SimpleStateMachine">
    <property name="Condition" value="ExamScore >= 25"/>
    <property name="State" ref="FirstInterview" />
  <object>

  <object id="ExamToRejected" type="SimpleStateMachine.Link, SimpleStateMachine">
    <property name="Condition" value="ExamScore < 25"/>
    <property name="State" ref="Rejected" />
  <object>

  <object id="FirstInterviewToSecondInterview" type="SimpleStateMachine.Link, SimpleStateMachine">
    <property name="Condition" value="FirstInterviewAccepted"/>
    <property name="State" ref="SecondInterview" />
  <object>

  <object id="FirstInterviewToRejected" type="SimpleStateMachine.Link, SimpleStateMachine">
    <property name="Condition" value="!FirstInterviewAccepted"/>
    <property name="State" ref="Rejected" />
  <object>

  <object id="SecondInterviewToAccepted" type="SimpleStateMachine.Link, SimpleStateMachine">
    <property name="Condition" value="SecondInterviewAccepted"/>
    <property name="State" ref="Accepted" />
  <object>

  <object id="SecondInterviewToRejected" type="SimpleStateMachine.Link, SimpleStateMachine">
    <property name="Condition" value="!SecondInterviewAccepted"/>
    <property name="State" ref="Rejected" />
  <object>

  <object id="Exam" type="SimpleStateMachine.State, SimpleStateMachine">
    <property name="Id" value="exam"/>
    <property name="Name" value="Exam"/>
    <property name="Links">
      <list element-type="SimpleStateMachine.Link, SimpleStateMachine">
        <ref object="ExamToFirstInterview"/>
        <ref object="ExamToRejected"/>
      <list>
    <property>
  <object>

  <object id="FirstInterview" type="SimpleStateMachine.State, SimpleStateMachine">
    <property name="Id" value="first_interview"/>
    <property name="Name" value="First Interview"/>
    <property name="Links">
      <list element-type="SimpleStateMachine.Link, SimpleStateMachine">
        <ref object="FirstInterviewToSecondInterview"/>
        <ref object="FirstInterviewToRejected"/>
      <list>
    <property>
  <object>

  <object id="SecondInterview" type="SimpleStateMachine.State, SimpleStateMachine">
    <property name="Id" value="second_interview"/>
    <property name="Name" value="Second Interview"/>
    <property name="Links">
      <list element-type="SimpleStateMachine.Link, SimpleStateMachine">
        <ref object="SecondInterviewToAccepted"/>
        <ref object="SecondInterviewToRejected"/>
      <list>
    <property>
  <object>

  <object id="Accepted" type="SimpleStateMachine.State, SimpleStateMachine">
    <property name="Id" value="accepted"/>
    <property name="Name" value="Accepted"/>
    <property name="Links">
      <list element-type="SimpleStateMachine.Link, SimpleStateMachine">
      <list>
    <property>
  <object>

  <object id="Rejected" type="SimpleStateMachine.State, SimpleStateMachine">
    <property name="Id" value="rejected"/>
    <property name="Name" value="Rejected"/>
    <property name="Links">
      <list element-type="SimpleStateMachine.Link, SimpleStateMachine">
      <list>
    <property>
  <object>


  <object id="InterviewProcess.InterviewStateMachine" type="InterviewProcess.InterviewStateMachine, InterviewProcess">
    <property name="AllStates">
      <list element-type="SimpleStateMachine.State, SimpleStateMachine">
        <ref object="Exam"/>
        <ref object="FirstInterview"/>
        <ref object="SecondInterview"/>
        <ref object="Accepted"/>
        <ref object="Rejected"/>
      <list>
    <property>
    <property name="InitialState" ref="Exam"/>
  <object>

  <object id="SimpleStateMachine.IStateMachineManager" type="SimpleStateMachine.StateMachineManager, SimpleStateMachine">
  <object>

<objects>


Quite Simple? I think so :) Let us try it.


At the end I am not saying that this a replacement for windows workflow foundation is a very powerful framework but I am only pushing people to think outside of the box.

You can refer to the full source code here and don't forgot that I used Visual Studio 2010 Beta 2. Good Luck!

The initials of my blog are WWWW, isn't this cool? :D ... maybe this will be the next WWW ;).

Friday, April 4, 2008

Steganography in C#

It has been a while since I wrote my last blog, but anyway I am back again. I am going to talk today about Steganography using C#.

Well let us define Steganography first. According to Wikipedia:
Steganography is the art and science of writing hidden messages in such a way that no one apart from the sender and intended recipient even realizes there is a hidden message. By contrast, cryptography obscures the meaning of a message, but it does not conceal the fact that there is a message.”

So it is all about information hiding, today I will not get into the different techniques of steganography . I will just talk about one of my project that I used steganography in it.
It was required to implement an application that will be able to sign files digital using the RSA Algorithm.


The application provides some features and they are listed as follows:

1. Signing Files: Files can be signed and store the signature inside it or in another separate file
2. Signing Wave Files: The application signs wave files by signing the header of the file and then store and hide this information inside the wave file

The operation of the file signing is divided into three states:
1. Hashing:
In this operation we read the data that is going to be hashed. Depending on the hash function provided by the framework, you can hash the data in order to be ready for the next step.

2. Signing:
In this operation we are going to sign the data received from the previous step. All we have to do is to encrypt the provided data using the private key of the user.

Here is the method I used to sign the data:

public byte[] SignData(string data, HashType hashType)
{
HashWrapper hasher = new HashWrapper(hashType);
byte[] bytesArraySignedValue = rsa.SignData(HelperFunctions.ConvertStringToByteArray(data), hasher.GetHasher());

SignedValue = HelperFunctions.ConvertByteArrayToHexString(bytesArraySignedValue);

return bytesArraySignedValue;
}

3. Verification:
In this step we are going to verify the signature. In order to do that we have to hash data and keep the digest, then decrypt the signature using the public key. Both should match in order to be a valid signature.

Here is the method I used to verify the signed data:

public bool VerifySignedData(string data, HashType hashType, byte[] signature)
{
HashWrapper hasher = new HashWrapper(hashType);
return rsa.VerifyData(HelperFunctions.ConvertStringToByteArray(data), hasher.GetHasher(), signature);
}

It seems that Microsoft has done all the work for you ;)

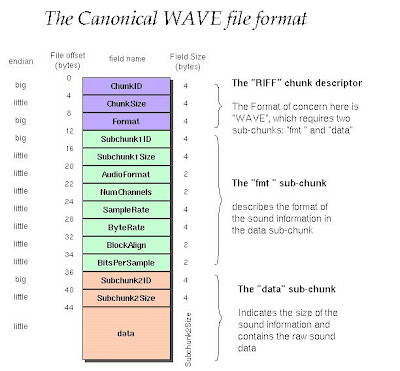
I will give you a breif about reading wave files in C#, For more information regarding reading wave files format please refer to the following link. The WAVE file format is a subset of Microsoft's RIFF specification for the storage of multimedia files. A RIFF file starts out with a file header followed by a sequence of data chunks. A WAVE file is often just a RIFF file with a single "WAVE" chunk which consists of two sub-chunks -- a "fmt " chunk specifying the data format and a "data" chunk containing the actual sample data.
Signing Wave Files:
I used a new idea by signing wave files. Signing wav files operations is similar to signing a normal file. First, we have to calculate the signature of the input file but instead of calculating the digest for the whole file. We will calculate the digest for the header only. Then encrypt this hash using the private key. The only difference is the storing operation. We will store the signature bits, by changing the least significant bit in all the wave samples according to the signature bits. This bit won’t make a difference in the sound of the file and we will have the digitally signed.

Application Logical Design:


*Logging Module: This module is responsible for the logging functionality across all the application
*Helper Classes: This module includes some common functionalities like handling the bit manipulation using the c# language
*Wave File Module: This module is responsible for handling the wave operations: Reading wave binary data, writing a new wave file and signing the wave files
*RSA Wrapper: This module wraps the functionality of the RSA algorithm. It facilitates the using of encryption depending on the application logic
*Hash Wrapper: This module is responsible for wrapping the hash algorithm. It uses the hash service providers available through the dot net framework
*Presentation Layer: This module is responsible for handling the UI functionalities across all the application


I used Visual C# 2005 to implement this application. I am sharing the source code, I hope it could be helpful. You can find it here. Pleas let me know your feedback.


Download: DigitalSigner.zip

Friday, August 24, 2007

Erlang: Concurrency and Distribution (Part 2)

One of the main strengths for Erlang is support for concurrency and distribution. It has a small set of primitives to create processes and communicate between them. Erlang processes are not operating system processes or threads, but they are lightweight threads similar to Java's "green threads".

Erlang is designed to be run in a distributed multi-node environment. Every computation in Erlang is performed within a process. Processes have no shared memory and communicate by asynchronous message passing. This is the philosophy of Erlang, the Concurrency Oriented Programming (COP). You have to think of your design from this prospective. Your application consists of a set of processes may be distributed on different machines.

Here is a simple application to illustrate the feautres I was talking about. A process sends a message to another process using the send construct: Pid ! Message. Even if the Pid doesn’t exist, the send will succeed. A process can block to receive a message by using the receive construct. The receive construct may also take an optional timeout value in millseconds, after which the “after” clause of the receive construct is executed.


-module(IPCExample).

-export([main/0, thread/0]).

main() ->

Pid = spawn(receive1, thread, []),

io:fwrite("Spawned new process _w_n", [Pid]),

Pid ! hello.

thread() ->

io:fwrite("This is a thread._n", []),

process_messages().

process_messages() ->

receive

hello ->

io:fwrite("Received hello_n"),

process_messages()

after 2000 ->

io:fwrite("Timeout._n")

end.


Process IDs do not have to refer processes running on the same machine as the processes can be distributed an remote machines. So you can spawn a process using the node name and use the returned process ID to send messages just as if it were a process on the local machine.


Pid = spawn(remote_node,process1, thread, []) Pid ! a_message
Pid ! a_message


Erlang handles the creation of the processes very efficiently. Here is a simple graph comparing Java, C#, Erlang comparing the time taken to create processes and asynchronous message passing.


This figure compares the time of creation of processes in Erlang versus Java and C#. We observe that the time taken to create an Erlang process is a constant 1 micro second up to 2,500 processes; and then it increases to about 3 micro second for up to 30,000 processes. As for Java and C# a small number of processes takes about 300 micro second to create a process. Creating more than two thousand processes is impossible.
This figure compares the time of message passing between different processes in Erlang versus Java and C#. The time to send a simple message between two concurrent processes running on the same machine as a function of the total number of processes. We see that for up to 30,000 processes the time to send a message between two Erlang processes is about 0.8 micro second. For C# it takes about 50 micro second. per message, up to the maximum number of processes (which was about 1800 processes). Java was even worse, for up to 100 process it took about 50 micro second per message thereafter it increased rapidly to 10ms per message when there were about 1000 Java processes.

It is quite clear that Java and C# can't compete with Erlang in this features. We have to realize that the world is going towards parallel processing even we don't accept Erlang as a language I think it will take place in the next decade.

To be continued ...